Tuesday, December 11, 2012

I have never meet a latke I did not like...


Apple Cider Latke from She Knows


“It is very frustrating not to be understood in this world. If you say one thing and keep being told that you mean something else, it can make you want to scream. But somewhere in the world there is a place for all of us, whether you are an electric form of decoration, peppermint-scented sweet, a source of timber, or a potato pancake.” 


   Growing up my family would be invited to celebrate Hanukkah each year with close friends. The father was one of the most fabulous chefs and each year he and my mother would get together in the kitchen and make amazing food for us to enjoy together at the table. 
  My favorite thing that I looked forward to each year was the latke. I would look forward to making them, frying them and eating them. Each year they would be a little different from the year before, never once repeated and always equally as good. Sometime they would be made with sweet potatoes, other times they would have carrots or zucchini, one year they even had cranberries in them! 

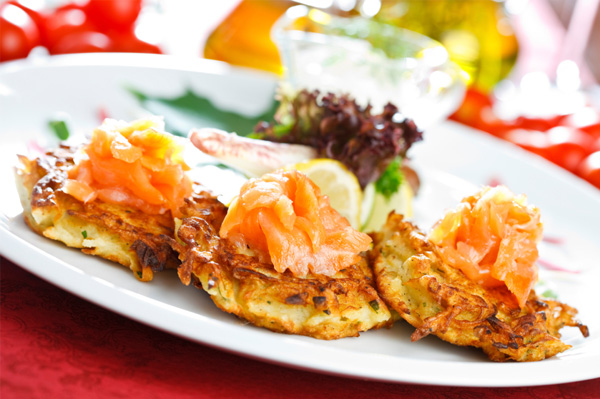
Smoked Salmon with Sour Cream and Smoked Salmon

 Did you know that latkes are fried to celebrate the Miracle of Oil?

This celebration commemorates the time when a small guerilla (surprise attacks) army of Jews defeated the Syrian king Antiochus IV (c. 215-164 B.C.), who had taken over Jerusalem and tried to destroy Judaism. Antiochus IV filled the Jewish temple with Syrian idols (statues or images of gods). After the Jews, led by Judas Maccabee, recaptured Jerusalem, they reclaimed their temple. When they wanted to light their holy lamps, they found only one vial of oil. That this small amount of oil kept the lamps burning for eight days was declared a miracle. During the eight days of Hanukkah (also spelled Hannuka or Chanukah), Jews light candles in a menorah (candle holder with places for nine candles), exchange small gifts, and make donations to the poor. The ninth candle on the menorah is called the shammash, and it is used for lighting the other eight candles.


 Here is the basic recipe that has been taught to me and I use to create the best base for building. It can be multiplied and divided to fit your needs or guest count. You can also add in other vegetables like beets, celery root, turnips or squash and adjust the amount of potatoes to fit the recipe.

1 lb of Potatoes
2 Carrot
1 onion 
1 Egg
1 tsp Baking Powder
2 tbs of Flour
Salt & Pepper to Taste

1/4 cup of Vegetable Oil for frying
Cast Iron Skillet

 Using a shredding plate or grater shred the potatoes, carrot and onion separately. 
 Line a bowl with a tea towel or cheese cloth. Pour the potatoes over the cloth and fill with cold water just until the potatoes are covered. Let sit for 30 minutes. *Soak the potatoes in a mixture of Apple Cider and water for a different flavor!
 After 30 minutes add the onion and carrots over the potato. Lift the cloth out of the bowl straining the water out of the vegetables. Twist the ends of the cloth wringing out the water from the vegetables and set aside. 

Add the vegetables back to the bowl with the egg, flour, baking powder and salt & pepper. Combine all the ingredients until they are covered evenly. 
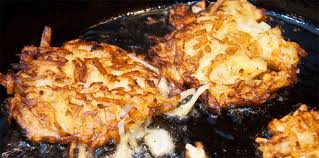
Heat the oil over medium to high heat to just before smoking, about 3 to 4 minutes. Using a tablespoon scoop the latke mixture into the frying pan and flatten with a slotted spatula. Cook until the latke becomes brown and crisp, about five minutes, then flip and repeat. 
  Once the latkes are golden brown and crisp transfer the to a cookie sheet with a mesh drying rack in the oven at 200 degrees. This will keep them warm and also allow for the excess oil to drain off. 
  Add more oil to the pan when need but, make sure it comes up to temp before adding the mixture or the latkes will become soggy. 

  Traditionally latkes are served with sour cream, apple sauce and smoked salmon. But, you can dress them up with poached eggs, greek yogurt, creme fraiche , mascapone, caviar, shaved radish, scallions, or with a burger! 


Friday, November 23, 2012

Turkey, Turkey, Turkey


          Thanksgiving is one of my favorite holidays of the year. Everyone over indulges without feeling guilty and you are doing it together in solidarity with your family and friends. In my family we always over estimate the amount of food that is needed with the thought of plenty of leftovers to hold everyone over just in case there is a national shortage of food for the next week. 
 Over the years I have become creative in seeking ways to use the leftover in some for other than Turkey Soup or Sandwiches. In the spirit of giving I have complied a list of some of my favorites finds to share with all!


Breakfast
  • Thanksgiving Baked Eggs from Via Viands - Warm, cozy and delicious baked eggs with leftover stuffing, potatoes, squash and turkey (really anything that you have) make up this perfect brunch dish for the day after Thanksgiving meal. Serve it up with some coffee and spiked egg nog and you are good to go!
  • Leftover Thanksgiving Frittata from Vanilla Late - A fritatta is truly one of the most amazing and simple breakfast dishes to make that will feed many, use few dishes and leave none hungry. As good as they are warm they are also good cold too. 
  • Pilgrim Eggs Benedict from Brigs Restaurant - Poached eggs, over mashed potatoes, stuffing, squash, or sweet potato topped off with some hollandaise sauce and cranberry sauce. Oh MY!
Lunch
  • Curried Turkey Salad from Simply Recipes - Spread a little leftover cranberry sauce on toasted bread and scoop on this yummy salad instead of a regular sliced turkey sandwich. So Good...
  • Turkey Bacon Avocado Sammy from the Hen Basket - serve it up warm with some melted cheese (I used Monterey Jack in place of Swiss,) need I say more.
  • Turkey Cranberry Quesadilla  from YumSugar - Good for lunch or as a snack to share. However, be careful as they are addicting. 
Dinner (Round Two)
  • Turkey Pot Pie from Full Bellies, Happy Kids - This is sure to be a crowd pleaser for all ages. 
  • Thanksgiving Salad from Serious Eats - If you are feeling a little guilty about the third helping of green bean casserole and two slices of pie, then this is for you. You can boost up the veggies and use quinoa as substitutes. 
  • Not Your Traditional Leftover Turkey Soup - Eating Well featured this yummy Squash and turkey Soup that can be made with the leftover Turkey. It has a little kick to it from the pepper flakes but, it is calmed by the lime juice. Add a dollop of Cabot's Low Fat Sour Cream or Fat Free Cottage Cheese and this is a healthy refresher from the previous day's feasting. 


Tuesday, October 16, 2012

Play Dress Up with Your Mac & Cheese


 I love Mac & Cheese! Easily it ranks right up in my top ten favorite foods to eat anytime. Mac & Cheese has been around since the medieval times with a recipe found in the oldest known cookbook, Libre de Conquina. As it has stood the test of time and become a favorite of most all kids, big and small, it is also a dish that can be and has been prepared in so many ways.  Some have it homemade, semi-homemade, frozen or from a box. Nonetheless, there is not real right or wrong way to make mac & cheese. 

  Often times I like to dress up my mac & cheese with different ingredients to mix up the flavor a little bit. I start off with one of the Drake's Frozen Mac & Cheese Dinners. I love Drake's because it has the right amount of cheesy sauce and the bigger elbow noodles that are made from fresh pasta! They also use milk and cheese that has no artificial hormones or antibiotics. I will defrost the mac & cheese in the fridge ahead of time making it easier to mix in the ingredients before baking (and it cuts the baking time down by more than half.) Often I will also have to transfer the mac & cheese to a bigger baking dish to make sure there is enough room for all the ingredients!


Broccoli Mac & Cheese

  To make Broccoli Mac & Cheese just add 2 cups of broccoli florets (defrosted) to 1 Drakes Mac & Cheese. Transfer the container of the Mac & Cheese to larger baking pan or dish. Mix in the broccoli and top with bread crumbs. Bake at 375*f until the top is brown and it is warm all the way through. 
 
P.S. Sometimes if I have left over chicken I will add it as well ;)


Jalapeño & Bacon Mac & Cheese
Jalapeño & Bacon Mac & Cheese

  This makes a great side dish to tacos, fajitas, mexican chicken or just on it's own! Just add one can of chopped jalapeño peppers and 6 strips of bacon that is cooked and chopped into small pieces. Mix the two ingredients to the mac & cheese and bake. Top with chopped green onions before serving.


Hot Dog Octopus!


  How cute are these guys?!? They are such a great idea for a party or just for any day. All you need to do is slice the hot dog in half half way and then cut the halves in half again to make for legs ( I know it four legs shy of a real octopus but, it is for the cuteness factor.) Put the uncooked hot dogs in a pot of boiling water and cook as the instructions suggest. Top each plate of mac & cheese off with an octopus.  For a little more flair you can add goldfish cracker and peas too.


Monday, October 15, 2012

Happy Chicken Cacciatore Day!!


Today is Chicken Cacciatore Day and what a perfect day it is for this warm flavorful fall dish! Chicken Cacciatore is super easy and a healthy dinner to make. You use just one pot for the Cacciatore and one for the pasta! It is best to give yourself a little time for the dish to cook and is even best made ahead of time to allow for the flavors to develop. 


 Ingredients:

  • 1 lb of boneless skinless chicken breast
  • 1 lb of boneless skinless chicken thighs
  • 1 green pepper sliced
  • 1 red pepper sliced
  • 1 red onion sliced
  • 2 stalks of celery sliced
  • 4 cloves of garlic smashed
  • 1 package of mushroom sliced
  • 1 cup of dry red wine
  • 1 can of San Marzano Crushed or Diced Tomatoes
  • 1 bay leaf
  • 1 sprig of thyme
  • 1 spring of rosemary
  • salt & fresh cracked pepper to taste
  In a large pot or dutch oven over medium/ high heat add the olive oil to pot. Warm up the 1/2 the oil for a minute or just until it begins to swirl and loosen up. Using a pair of tongs and being careful of the oil splatter add the chicken thighs first, layering them evenly on the bottom of the pot. Next add the chicken breast. Let each cook just until they are browned before flipping to the other side (about 5 minutes.) Once both sides are brown remove the chicken from the pot and set aside on a plate. Add the last of the oil, the garlic and the vegetables. sauté the mixture for 8 to 10 minute or until the onion starts to become clear. Add the cup of wine, scrape the bottom of the pan to remove and bits that may have become stuck. Next add back in the chicken and top off with the can of tomatoes and fresh herbs. Bring the contents of the pot to a low simmer and cook for 1 1/4 to 1 1/2 hours. Add water if needed. Taste before serving to measure the amount of salt and pepper to be added.

 Serve over pasta (egg noodles, tagliatelle, linguini or cavatelli) or over homemade creamy polenta. 

How to Make Soft Pretzels using Frozen Pizza Dough


 It seems like I am always on a search on how to multipurpose different foods and products. In one of my search the other day I stumbled upon this great idea over at All You that had a bunch of different uses for pizza dough. My favorite was the tip for making Soft Pretzels.


 There is no real recipe since the dough is already made, you just need to defrost the dough and give it a good twist!

 Instructions:


  • Defrost 1lb of white or wheat pizza dough
  • Divide thawed dough into 12 pieces
  • Form each piece into a rope and twist into a pretzel shape
  • Brush with a beaten egg and sprinkle with coarse salt
  • Place on a lined baking sheet and bake until golden brown in a 375*f oven
  • Serve with a side of mustard

Thursday, October 11, 2012

Buffalo Bites for Game Time or Anytime


 Buffalo Chicken bites and tenders are one of my favorite things to have as an appetizer out with friends or as a game time snack. However, the deep fried and breaded chicken is not the healthiest thing to eat, especially if it also being dipped in bleu cheese dressing!


 Betty Crocker has a recipe that you can lightly bread pieces of chicken in Bisquick and cornmeal that you can dip in reduced/ lower fat homemade Bleu Cheese Sauce.

Of course I made just a few modifications from the original to get in some Munroe Dairy/ Cowtruck love!

Ingredients:


  • 1 egg white
  • 1/3 hot wing sauce (like Frank's Red Hot)
  • 1 lb of boneless skinless chicken breast cut into 1" pieces
  • 3/4 cup of Original Bisquick mix
  • 3 tbsp of Kenyon's Cornmeal
  • 1 tsp of salt
  • 1/2 tsp of pepper
 In a large bowl mix the buffalo sauce and egg white until combined. Add the chicken bites to the mixture. Cover the bowl and refrigerate for at least one hour to marinate the chicken.
 In a resealable plastic bag add the Bisquick, cornmeal, salt and pepper. Using a slotted spoon add a few pieces of the marinated chicken to the bag and toss around until evenly coated. remove the coated chicken from the bag with the spoon and place on a line cookie sheet. Repeat until all of the chicken is coated. 
  Place the cookie sheet into a 400*f oven on the middle rack and cook the bites for 15 to 18 minutes or until fully cooked (times may vary depending on the thickness and size of the chicken bites.) 


 You can also do the same thing to Cauliflower!!! This is perfect for those Meatless Monday Night Games...

 Just switch the chicken out for one head of cauliflower. Cut the into 1" florets and treat it the same way. The cooking time even remains the same!


Reduced Fat Bleu Cheese Dipping Sauce:

  • 3/4 cup of crumbled Bleu Cheese
  • 6 tbsp of Low Fat Cabot Sour Cream 
  • 6 tbsp of Low Fat Mayonnaise
  • 3 tbsp of Low Fat Milk
Combine all of the ingredients in a bowl and combine together. Cover the bowl and place in the refrigerator until ready to serve. 


Tuesday, October 9, 2012

Roasted Butternut Squash and Apple Soup


  Tis the season of apple picking, squash, pumpkin and all things Fall. The leaves are now turning their seasonal bright red, yellows and oranges, the nights are getting crisper and there is the faint smell of a fireplace burning. In my household this also means it is the time of year for soups, chili and stew. I love soup and could eat it almost everyday! I am not sure if I have a favorite type but, Butternut Squash is in the top 10 of favorites and over the years I have made many different varieties of it. Some have bacon, carrots, cranberries, and sweet sweet fall apples.
 
Butternut Squash & Apple Soup

Ingredients
  • 1 medium Yellow Onion (chopped 1" pieces)
  • 1 rib of Celery chopped
  • 1 Carrot chopped 
  • 2 Shallots chopped
  • 4 cloves of Garlic
  • 1 - 20 oz package of Diced Butternut Squash
  • 1 large hearty Apple cored and diced (Gala, Granny Smith, or Fuji)
  • 4 cups of Chicken or Vegetable Broth
  • 1 Bay Leaf
  • 2 tbsp of Olive Oil 
  • Salt & Pepper
  • 1 cup Whole Milk or Light Cream

Photo Credit: Choosing Raw 

 On a lined cookie sheet place the onion, celery, shallots, garlic, apple, squash and bay leaf. Drizzle evenly with olive oil and sprinkle with salt and fresh ground pepper. Roast in a 425*f oven for 25 to 30 minutes or just until softened and the corners are turning brown. (Can be roasted ahead of time by one day.) Remove the Bay Leaf and discard
  In a large stock pot add the butter over medium heat. When the butter has just melted add the roasted vegetables to the pot and cook for 5 before adding the broth. Once the broth is added simmer for 30 minutes until all the vegetables are very soft. Let the soup cool slightly before adding it to the food processor for blending or before using an immersion blender. Once the soup is blended add the milk to the cooled soup and incorporate it before returning the pot to the stove to bring to serving temperature.

Serve the soup in bowls with a dollop of Cabot Sour Cream! 


Shameless French Fries in All Flavors

Photo Credit: Oprah.com
 French Fries are often a favorite of kids (and adults too!) They are the ying to a burger or chicken tenders yang. With more families watch the quality of food and nutrition that makes it to the dinner table these days french fries are more of a treat than a stable.  But, this does not always have to be the case... French fries do not have to be made with potatoes and they do not have to be fried. They can be made with all types of vegetables and baked in the oven with a deceiving crisp of deep fired goodness.

  It all starts with a simple batter or coating for the "fries." My favorite is a simple base of Kenyon's Cornmeal, flour, salt, and eggs. It is a the foundation for a crispy coating that will impress event the pickiest of eaters and you can build on it by adding your own seasonings like, fresh herbs, dried peppers, and grated cheeses.

Coating Ingredients:


  • 8 ounces of sliced vegetable (sticks) 
  • 2 large eggs beaten
  • 2 tsp of salt
  • 1/2 cup of Kenyon's Cornmeal
  • 1/4 cup of unbleached flour   
In a medium shallow bowl beat the eggs and set aside. In a large shallow bowl combine the salt, cornmeal, flour and seasoning of your choice.
 First dip (or dredge) the vegetables in the egg and then coat them in the cornmeal four mixture. Place the coated vegetables on a lined cookie sheet. Bake the fries at 425*f for 15 to 20 minutes or until the coating is crispy and golden brown.

Serve with BBQ, ketchup, or any sauce of your choosing!

Here are a few of my favorites...

Quick and Easy Cheaters Aioli:

Spicy Siracha Aioli

  • 1 tsp of roasted garlic(from a jar or tube)
  • 1 tbsp of olive oil (not EVOO)
  • 3/4 cup of light Mayonnaise
  • 1 tsp of Siracha Sauce
 In a bowl combine all of the ingredients together and serve. 

Chipolte Aioli

  • 1 tsp of roasted garlic(from a jar or tube)
  • 1 tbsp of olive oil (not EVOO)
  • 3/4 cup of light Mayonnaise
  • 1 tsp of Chipolte Pepper Flakes
 In a bowl combine all of the ingredients together and serve. 

Tarragon Aioli
  • 1 tsp of roasted garlic(from a jar or tube)
  • 1 tbsp of olive oil (not EVOO)
  • 3/4 cup of light Mayonnaise
  • 1 tsp of dried Tarragon or 2 tbsp of fresh chopped
 In a bowl combine all of the ingredients together and serve. 

Friday, July 6, 2012

Grilled Salmon and Avocado Salad


  Now that the 4th of July is past, it is time to move on from the hot dogs and hamburgers. I am not sure about you but, I am definitely burger and dogged out!
 With the hot summer days and nights it the perfect time for me to start perfecting my summer salads again. The last thing I want to do is turn on the oven and bring the temperature of the kitchen up by another 20 degrees. So... For the next 8 weeks my grill will be in over drive cooking up all the dinner table essential!
 A few weeks back I was looking for a light and flavorful salmon salad when I stumbled across this fresh little thing over at avocado.org. There were some slight changes that had to made in order to use the ingredients that I had on hand that came in my delivery from the cowtruck. Also, the whole thing came together in less than 30 minutes!!

Grilled Salmon:
 2 - 8oz filets of Salmon
 1/4 cup of olive oil
 1 tablespoon of Orange Juice
 Sea Salt & Pepper to taste

Salad:
 1/4 a package of Olivia's Baby Spinach
 1/4 a package of Olivia's Mixed Greens
 1/2 a red onion sliced thin
 1/4 cup of English Cucumber Sliced thin
 1 orange, peeled and sliced (pith removed*)
 1 avocado sliced
 1/4 cup of Narragansett Creamery Salty Sea Feta Crumbled
 1 ear of fresh grilled corn off the cob
 1/4 cup of D.E. Vine Honey Balsamic Dressing 

Combine the olive oil and orange juice in a bowl with the salt and pepper. Marinate the defrosted Salmon in the olive oil and orange juice for at least 15 minutes while you prepare the salad ingredients (can be marinaded for longer in the refrigerator.) Grill over medium heat for 6 to 8 minutes on the bottom side, then flip and cook for another 6 to 8 minutes.

 In a large bowl toss together the all the salad ingredients with the salad dressing until evenly coated. Plate the salad onto two plate or large pasta bowls and top with the grilled salmon. Serve and Enjoy!

 I have also served this same salad with a scoop of Quinoa or Couscous over the greens and under the salmon either warm or chilled. It is a great way to use up extra left overs that you might have in the fridge. Left over grilled vegetables are another great options too.
 Chicken, shrimp or cod can also be substituted for the salmon using the same marinade. Just make sure to adjust your grilling time.

 *Leaving the pith on the orange will cause a bitter aftertaste that can offset the flavors of the salad.

Tuesday, June 12, 2012

Have Chicken, Bacon & Ranch. Will Make Pizza!

In my house pizza is always a winner for dinner any night. However, I am always up for trying something new and different. Pizza can be a great way of getting creative and cleaning out the fridge at the same time!
photo credit: Feisty Fork
   The other day I was perusing the perusing the internet looking for new ideas to add to my list of must try's when I came upon a post over at The Feisty Fork. It immediately caught my eye as a yummy and easy dinner choice for a weeknight meal. Because, it was a Monday I cheated with the Top This! Pizza Crusts instead of a making my own dough or using frozen. However, it did cut the prep time down significantly!

Makes 2 Pizza's

 1 Package of Whole Wheat or White Top This! Pizza Crusts
 8 oz of your favorite ranch dressing
 1 package of Supreme Shredded Cheddar Cheese
 2 Maine Backyard Tomatoes diced
 1 red onion chopped
 1 cup of corn kernels
 1/2 lb of cooked Plumrose Bacon crumbled
 3 grilled chicken breasts chopped

Preheat the oven to 500*f or the grill to 600*f. If you are using a  pizza stone make sure to preheat the stone in the oven or on the grill.

  Using a spoon or spatula evenly spread the ranch dressing down on the base of the pizza as you would the sauce. Next layer on the rest of the toppings to evenly cove the crust of the pizza. Make sure to not gather too many toppings in the center of the crust as it will weight it down and get soggy. Finish the pizza with the cheese.


 Bake in the oven for 10 to 12 minutes or until the edges of the crust are golden brown and the cheese is melted. Let the pizza sit for 2 to 4 minutes before slicing so you do not pull the topping when cutting.
 Slice and enjoy with a yummy summer salad or fresh garden veggies on the side!

Monday, June 11, 2012

Fresh Lemon Garlic Grilled Shrimp Caesar Salad

        
photo credit: The Salon


  I had found an amazing looking salad over at the Salon Kitchen Challenge. It was the winning entry by Lucy Mercer for a Loaded Caesar Salad with lemon, garlic shrimp and avocado. It had immediately caught my eye and stomach. The salad itself is so versatile, in being that you can add more fresh veggies, change the shrimp for salmon, chicken or steak of just leave it as is (which is excellent!)

I have made a few adaptions from Lucy's Original Recipe work with what is available from the Cowtruck and to also adapt to what I already had in my fridge too ;)

Caesar Dressing:

 2 lg egg yolks
 1 tbsp  of fresh lemon juice
 1 tbsp of white wine vinegar
 1/2 tsp of  Worcestershire sauce
 1 tbsp of Dijon mustard
 1/4 tsp of anchovy paste*
 1/4 cup of olive oil**

 In a blender combine all of the ingredients, except for the oil, and blend until full combined (you can whisk if a blender is not available.) Slowly add the oil the other ingredients until it is emulsified. Refrigerate the dressing until ready to serve. Can be made ahead by 4 hours.

* I keep a tube of anchovy paste in my refrigerator at all times. It is easier and more economical than dealing with cans of anchovies.
** Note that the recipe calls for olive oil not extra virgin olive oil. The EVOO flavor will be too strong for the dressing and over power the rest of the ingredients.

For the Salad:
 
 2 heads of romaine lettuce chopped into 1 inch bite sized pieces
 1/4 cup of grated Atwell's Gold Cheese from Narragansett Creamery
 1/2 red onion diced
 1 avocado diced
 
 Just before serving toss the lettuce in the dressing. Equally the divide the lettuce onto four salad plates. Top each bowl with avocado and red onion and a sprinkling of Atwell's Gold Cheese.  Lay 2 skewers of cooked over each bowl of salad

Lemon Garlic Shrimp

 32 peeled shrimp 
 3 cloves of garlic, minced
 2 tbsp of olive oil
 3 tbsp of fresh lemon juice
 sea salt and fresh ground pepper to taste
 soak 8 -  4" skewers in water

 In a large bowl combine all of the ingredients and whisk together.  Toss the shrimp in the marinade until it is fully dressed. Cover the bowl and let it rest in the refrigerator for at least one hour.
 Skewer the marinaded shrimp five to six shrimp to a skewer.
On a preheated grill (medium to 400*f) lay the skewers on the grill grates and brush with the remaining marinade. After about 4 minutes flip the shrimp and cook until they are pink (about 1 to 2 minutes.)

 In place of the croutons I had made bread sticks using frozen pizza dough.

1lb of defrosted whole wheat pizza dough defrosted.
2 tbsp of melted unsalted butter
3 cloves of crushed garlic
sea salt & pepper to taste
sprinkling of chopped parsley

 Defrost the dough and work it into 8 equal sized balls. Roll the ball into tubes about 1/2 - 3/4 in thick and about 3 to 4" long.
 On a lined baking sheet or warm pizza stone place the bread sticks into a preheated 450*f degree oven for 12 to 14 minutes or until golden brown.
Pull the rack with bread stick out of the oven and brush the tops of the bread sticks with the melted butter and sprinkle with the salt, pepper, garlic and parsley. Return the rack to it's place and bake for another 2 to 3 minutes.
Serve the bread sticks warm with the salad.

Wednesday, May 23, 2012

DIY Deviled Egg Bar

  Bring it Back Old School with a Deviled Egg Bar!


Photo Credit: Maddycakes Muse


  Deviled Eggs were a staple of my youth. You could expect to find them at every family gathering, holiday and garden party. My mother even had a plate that was in the shape of the chicken with small grooves in place to hold the eggs so they would not slide around.
 Over the past few years I have seen deviled eggs appear as a retro option on an appetizer menu with different twists on the classic like: pulled pork, raisins and curry, and always bacon. It was recently when I was out with some girlfriends that I heard of the Deviled Egg Bar that was recently featured as the main appetizer at a hen party. It sounded so cool and fun! Immediately my attention was focused and now obsessed with having one myself.

Photo Credit: Maddycakes Muse
 There are several things that are pretty amazing about having a Deviled Egg Bar:
  1.   You can let your guest get creative and have fun with their food
  2. It is a relatively simple set up and you are not having to worry about making 5 different apps for the party. (A cheese board or veggie tray is the only addition you may need!)
  3. Much of the prep can be done ahead of time allowing for less stress!!!
  4. Everyone will walk away amazed at your ingeniousness and what a great host/ hostess you are! 
Martie Knows Parties


The Toppings selection is where you have all the fun! 
Keeping all the offering chopped into small bits so they can be sprinkled onto the yolk mixture and stick is very important. If the pieces are too big they will slide off and end up on the plate not the egg.
Here is a list of some of my favorites:  Apple wood Smoked Bacon, Blue Cheese, Crab, Capers, Curry Powder, Olives, raisins, Sun Dried Tomatoes, Pimentos, Roasted Red Pepper, Smoked Salmon, Ham or Prosciutto, Shrimp, Crab, Lemon Zest, Lobster bits, Feta Cheese Crumbles, Caviar, Sour Cream and assorted Fresh Herbs (basil, cilantro, chives, dill, parsley.)


Cauliflower and Potato Salad

        
Photo Credit: Eating Well Living Well


   It is no secret that for years I have been adding cauliflower to mashed potatoes, soups and other such things in order to cut down on the amount of starch and add some extra vegetable to a dish. Often times I will not announce this until after the meal has been devoured and the accolades given. It is the surprise of the diner's face that gets me every time, when they realize they have just eaten cauliflower (something they often attest to being a vegetable they do not usually like!)

 Now masking cauliflower in potato salad is little bit harder, nonetheless; over at the Guilty Kitchen I have found a delicious and mouthwatering recipe for a Cauliflower and Potato Salad that children of all ages and of the finickiest palates will enjoy! 

Cauliflower and Potato Salad: adapted from: Guilty Kitchen
Yield: 6 healthy servings
Prep Time: 20 minutes
Cooking Time: 15 minutes
Can be made one day ahead of serving

1 head of Cauliflower, cut into 1/2 inch pieces
1 lb of Narragansett White Potatoes, cut into 1/2 inch cubes
1 1/2 cups of peas
2 tbsp of olive oil 
2 large Christoper Ranch Shallots, sliced*
2 cloves of garlic, minced*
2 tbsp of white wine vinegar
3 tbsp of olive oil 
1 tbsp of horseradish
sea salt & fresh ground pepper to taste
2/3 cups of Narragansett Creamery Sea Salt Feta, crumbled
1 tsp Dijon mustard
1 tbsp mayonnaise
2 tbsp of Stonyfield Plain Yogurt


 In a medium size pot soak your cut potatoes in cold salted water for at least 30 minutes. Strain and rinse the potatoes. Refill the pot with room temperature water and return the potatoes to the pot and boil the potatoes on the stove until they are fork tender. Once they are done remove them from the stove, strain them and allow the potatoes to cool in the colander to drain of all excess water.
 In a steamer, steam the cut cauliflower until it is al dente, has a slight crisp, about 6 to 8 minutes. Allow the cauliflower to cool to room temperature. 
 Using the same steamer cook the peas for 4 minutes. Remove from the steamer and set aside to cool.
 In a small saute pan heat the 2 tbsp of olive oil over medium heat. When the olive oil begins to swirl and dance in the pan add the garlic and shallots. Saute until the shallots are translucent, about for to five minutes. 
 In a small mixing bowl add the following ingredients to make the dressing: olive oil, horseradish, salt and pepper, crumbled feta cheese, Dijon, mayo and yogurt. Stir until well combined.  Combine with the garlic and shallots. 
 Combine the potatoes, cauliflower and peas in a large mixing bowl. Add the dressing and gently toss the ingredients together making sure to coat evenly. 
 Cover the bowl and chill in the refrigerator until it is ready to be served!!
*If you do not want to use the garlic and shallots, chopped red onion can be substituted. Use 1/2 cup of fresh raw red onion (do not saute it.)

Monday, March 26, 2012

Mini French Toast!

Cinnamon Sugar French Toast Bites by: Multiply Delicious

 I love breakfast! However, from Monday to Friday I am not all that great at finding the extra few minutes in the morning to do anything more than pour myself a bowl of cereal or add some water to instant oatmeal. On a recent trip to the grocery store I had checked out a few different breakfast items in the freezer aisle that might be good items to have available. 
 After a brief perusing and label reading of the options available I had decided that it would be healthier for myself to make at home and freeze. Personally I have a thing about being able to identify and pronounce all the ingredients in the food that myself or those I care about will be consuming...

 French Toast Bites (or Sticks depending on what you prefer.) 

 As a child french toast was one of my favorite breakfasts to have, smothered in syrup, powdered sugar and butter! It can also be made ahead in bulk and frozen for reheating in the toaster oven or microwave quickly and easily too for a quick breakfast or snack.

Ingredients:
 
  8- 10 Slices of Bread* ( I prefer Cinnamon Raisin Bread)
  4 Eggs
  1 cup Milk**
  2 tablespoons of Sugar
  1 teaspoon of Vanilla Extract
  1/4 teaspoon of Ground Cinnamon
  1 tablespoon of Maple Syrup

  2 tablespoons of melted butter for brushing.

Preheat oven to 425*F

Stack the bread four to five slices high and cut into thirds lengthwise and again width wise to make small bite sizes pieces about one inch square. Set the bread aside until it is ready for dipping.

 In a large shallow bowl combine all of the ingredients (eggs, sugar, milk, vanilla, cinnamon and syrup.) Whisk together all of the ingredients until fully combined. Add about 10 pieces of the bread at a time to the mixture using a slotted spoon to toss them around the mixture to get fully coated. Use the spoon to transfer the cubes to a non-stick or greased cookie sheet brush the tops of the bites with the butter. You might need two cookie sheets.

  Bake for 10 to 12 minutes or until the tops are browned. Remove the pan from the oven, turn the bites over and brush with remaining butter. Return the pan to the oven and bake for another 6 to 8 minutes, or until the the bites are browned.

  Set aside a few to eat right away and let the rest cool on a bakers racks. Once the bites are cooled transfer 9 bites to a snack back and put them in the freezer to freeze. I will add all the snack bags to one large Ziploc freezer bag for better organization in the freezer and label and date the large freezer bag. To reheat the bites either heat them in the toaster oven 3 to 5 minutes or in the microwave for 1 minute. They can be microwaved right in the bag for a really quick snack on the go.

*If you have some bread left over that is a bit stale or is on it way to getting there that is best type of bread to use for making french toast. It will hold up to the egg dip much better and won't be as mushy.

** Milk: When cooking with milk I find that either low fat or whole milk is best, skim milk has a tendency to get watery. Buttermilk can also be used for a different flavor.

Tuesday, February 7, 2012

Alfredo. Alfredo. Alfredo

Kitchen Daily ~ Fettuccine Alfredo with Zucchini


Happy Fettuccine Alfredo Day!!! 

   An Alfredo sauce is one of the most versatile sauces that one can learn how to make and extremely easy too. You can have it with fresh or frozen vegetables, with chicken, steak or seafood. You can even customize the recipe to add more or less cheese and butter to make it as creamy and rich as you like. 
 In effort to continue with the my resolution of trying to eat and cook healthier meals I have made a few changes to the traditional Alfredo recipe that uses lots of heavy cream and butter and made a few substitutions like low fat milk less butter (there is not real substitute for the flavor of butter in my view.)


Narragansett Creamery Herb & Garlic Angelito
Basic garlic and Herb Alfredo Sauce:
 1 tablespoon of Sommer Maid Unsalted Butter
 1 teaspoon of  fresh lemon zest
 2 teaspoons of all purpose flour
 1 cup of Low Fat Munroe Dairy Milk
 2 tablespoons of Narragansett Creamy Garlic & Herb Angelito Cheese
 3/4 cup of grated Narragansett Creamery Atwells Gold Cheese
 Sea Salt & Pepper to Taste
12 ounces of Fresh Fettuccine or 1 lb of Dried Fettuccine Pasta

 Bring a large pot of salted water to a boil. Add the fettuccine and cook until al dente ( having a slight snap left to the pasta.) Once the pasta is cooked strain and drizzle with olive oil to prevent clumping. Reserve a cup of the pasta water and set aside to cool. 

 In a large skillet melt the butter over medium heat, careful not to brown or burn. Add the lemon zest cook for 1 minute until you smell the scent of lemon. Add the flour and stir with a wooden spoon, cook for about one minute or until you smell a slightly nutty scent. Using a whisk introduce the milk slowly stirring the constantly to prevent scalding. Once the sauce has begun to thicken, about three minutes, add the salt & pepper, Angelito Cheese and Atwells Gold Cheese. Continue whisking until the cheese is melted and fully combined. 

 Add the pasta to the skillet using a pasta fork or kitchen tings to mix. If the needed add a bit of pasta water to the Alfredo to loosen the pasta.

  If you want to add fresh veggies like zucchini ribbons, peas, or broccoli add them in after the Angelito and Atwells Gold. 
 As for meat you can cook in the  pan before hand and setting it aside to be re introduced after the cheese has  melted. Do not clean the pan between cooking the meat and the sauce, leaving the little bits of meat for flavor to cook into the sauce. Add the meat to the sauce after the  cheese has melted and the before adding the pasta. 

Tuesday, January 17, 2012

Spinach, Oven Raosted Tomato and Cheese Souffle

photo credit: Mango Tango


 My Grandmother, Betsy, was a woman of very few dishes. In fact all that I can remember were three chicken curry, tandoori leg of lamb and souffle. The later of the three is one that she was most proud of. for the fact that she could always make it from memory using anything that she found in the ice box or in the cupboards and it would always rise to perfection and taste amazing.
  While last night I took my turn at making a Spinach, Roasted Tomato and Cheese Souffle. Inside her old copy of Larousse Gastronomique I had found her notes on souffle making and decided I would take them to task.


Spinach, Roasted Tomato & Cheese Souffle:

Ingredients
cooking spray 
3egg yolks 
3 egg whites at room temperature
2 tablespoons of butter
1/2 teaspoon cornstarch
1/4 cup flour 
1/2 cup 1% milk
1.5 cups of grated Atwells Gold Cheese
1 cup of sauteed spinach*
1/2 cup of oven roasted grape tomatoes*
1 shallot diced

Directions 
Preheat the oven to 350. 

 Spray a 1.5 quart souffle dish with cooking spray and dust with flour. 

 Melt the butter in a medium pan. Add flour, stir constantly till it's combined, smooth and bubbly. Add in milk and continue to cook until the mixture is smooth and thick. Add cheese, stir to melt. Add spinach, tomatoes and shallots. Combine. Remove from heat and let cool
In a separate bowl. Beat the egg yolk until they become a pale yellow and frothy. Add to the cooled spinach, cheese and tomato mixture.
 Using a hand mixer or counter top mixer beat the egg whites and cornstarch to medium/ stiff peaks (about 4-5 minutes.) Do not beat them until they are dry.
 Using a silicone spatula gently fold the egg whites into the spinach, tomato, cheese combination. Transfer the mixture to the coated souffle bowl and bake for 30 to 35 minute at 350*f or until the the souffle has expanded and the top is golden brown. 
* It is very important not to bang your spatula on the side of the mixing bowl or to drop the souffle pan on the  counter. This can cause your souffle not to rise! Also leaving the door of the oven closed during baking is equally important.

Sauteed Spinach

Ingredients
cooking spray 
1 package of Whole Spinach (rinsed)
2 cloves of garlic crushed
1 tablespoon of Olive Oil 
Salt and Pepper to Taste


 In a large saute pan over medium high heat add the olive oil and garlic. Once the olive oil is warm add the rinsed spinach. Using a pair of tongs turn the spinach in the pan to ensure that it cooks evenly and does not brown and become bitter. 
 Drain and set aside. 

photo credit: GastroPig


Oven Roasted Grape Tomatoes

Ingredients
 

1 package of Grapes Tomatoes, cut in half
1 tablespoon of Olive Oil 
1 tablespoon of Herbs d'Provence
Salt and Pepper to Taste

Preheat the oven to 250*f


 Ina  large bowl combine the toamtoes, herbs, salt, pepper and olive oil. Toss together evenly coating all of the toamtoes. 
 On a lined sheet pan spread out the tomatoes cut side up. Place in oven and roast for 40 - 45 minutes or utill the tomaotes are brown at the edges and semi dehydrated. Be carefull not burn them as they will become bitter to the taste. 
Store extra toamtoes in a ziploc bag int he freezer or in a jar with olive oil in the fridge.