Thursday, March 28, 2013

Hamming It Up...

Daniele Foods' Locally Produced Line
Photo Credit: East Side Monthly


  Earlier this week I traveled down to Pascoag, RI to visit Daniele Foods. There I met with Davide Dukcevich and his brother Stefano to learn about their new line of cured meats that is 100% local. It all starts on small local farms, like Blackbird in Johnston, where the pigs are raised then the meat is cured and processed at the plant all right here in little Rhody
  They brothers worked with Rhode Island School of Design to create the art for the packaging and worked with Johnson & Wales to develop recipes as well. The products can be found a local market in Rhode Island (soon to be on the cowtruck!

Davide Dukcevich with prosciutto curing behind him
Photo Credit: Projo


The plant that hams currently hang in to cure was built in the earlier 1970's and is busting at the seams as Daniele Foods has grown with their products in the deli cases of markets all over the world.


 Everything began in Triste, Italy in the 1940's. The grandfather, Stefano Dukcevich, and his wife Carolina were refugees from Croatia that escaped to Italy with their young son, Vlado. It was here that they began to make cured sausages with traditional croatian ingredients like smoked paprika. Stefano would pedal the charcuteries from his bicycle to the residents of the village. 


Vlado Dukcevich


  It was Vlado that brought the Daniele from Italy to Rhode Island and bringing with him the flavors of his family's recipes with him to be made at the facility in Pascoag in the 1970's. 
 Recently they broke ground to build a new operations facilty to better handle production and bring everything together. Right now they are operating out of three location that are three miles apart from each other. It will be a state of the art facility using robotics while also keeping tradition in the old world style of curing and producing the meats. 


 While the local prosciutto will not be ready until September the Daniele house brand made an amazing sandwich on Sour Dough from Olga's Bakery with Narragansett Creamery Fresh Mozzarella, Olivia's Organic Baby Arugula and a drizzle of D.E. Vine Balsamic Dressing to finish it off. 

 Looking forward to trying it out on the Top This! Pizza Crust... Just looking at the one from the Black Market Bistro makes my mouth water. 

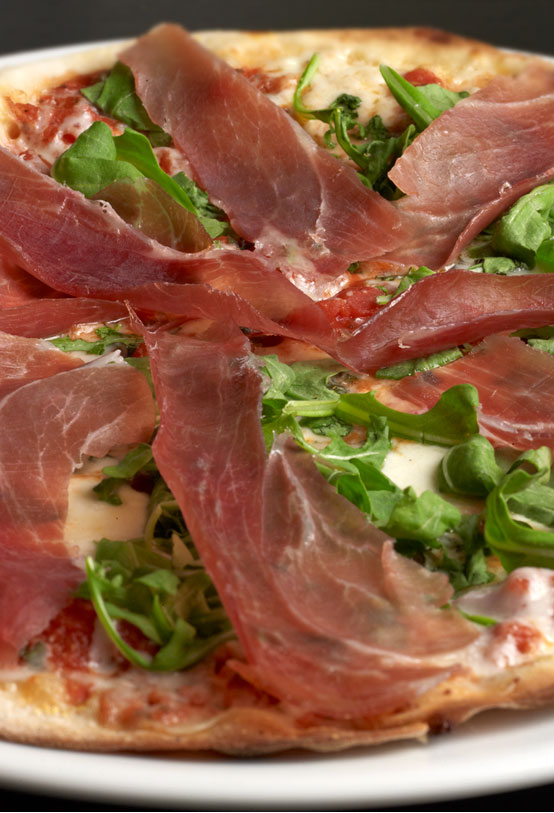
Black Market Restaurant


Irish Cheddar Soup Served Up Vermont Style

Photo Credit: Leah Haydock 


   This weekend on the drive through Vermont on the journey home we ended up by Simon Pearce just in time for lunch. Their Vermont Cheddar Soup is delicious and addicting with it's rich and creamy texture and powerful flavor. It is made with Vermont's own Cabot Cheddar Cheese which, is available from Munroe Dairy.  If you have ever had the fortune of having the soup before you understand the willingness to wander off the beaten path just a bit to stop in for a bowl of the yumminess and opportunity to wander around the old mill building to watch the glass blowing in progress and listen to the waterfall. 

Simon Pearce


Glass Blowing at Simon Pearce ~ Quechee, VT 

Glass Blowing at Simon Pearce ~ Quechee, VT 


Photo Credit: MiamiAvocado


To make it a meal all you need is a nice loaf of crusty bread for dipping and salad of Olivia's Organics Spring Mix lightly dressed with D.E. Vine Honey Balsamic Dressing. The soup is easy enough to make and keeps well in the freezer.  


 Here is the recipe from the restaurant at Simon Pearce: 

Ingredients

3 quarts water
2 cloves garlic, minced
6 oz. flour
5 oz.butter
1 cup heavy cream (whole milk can be 
substituted)
2 bay leaves 
1 lb. grated Cabot Sharp Cheddar cheese 
1 cup carrots, grated
1 cup celery, minced
1 small onion, chopped
2 cups half & half
1 teaspoon fresh thyme, finely chopped
Salt & fresh ground pepper
Methods/steps
Blanch carrots and celery in boiling water. Drain well and set aside. Bring water to boil. Melt butter in heavy stockpot, add onions & garlic, soften. Add flour to butter & onion mixture. Stir to combine well, turn heat very low. Stirring occasionally, cook about 15 minutes. Add water 1/3 at a time. Stir with whisk until smooth. Season with thyme, bay leaves, salt and pepper. Cook over low heat, until smooth and creamy. Add grated cheese.

Boil water in separate saucepan, add celery and carrots, cook until just tender. Drain well. Add celery-carrot mixture to large stockpot. Add half & half and heavy cream. Stir well. Serve hot, but do not overheat.

Check out the video of the restaurants former Chef Josh Duda making the soup here. In the video he uses chicken stock instead of water which, will add an even deeper flavor the to soup. If you want to keep it vegetarian you can use vegetable stock. 


Covered Bridge ~ Rebuilt and open after Hurricane Irene 


Monday, February 4, 2013

Tortellini Soup for National Soup Day


   February 4th is National Homemade Soup Day. However, being the Monday after Super Bowl Sunday I am looking for more of a 30 minute on pot meal...  Aha, Tortellini Soup with chopped tomatoes, fresh spinach and sliced mushrooms. Served up with a nice crusty bread and a salad is perfect for this sunny and cold winter's day. 


 Just recently we started selling the Mama's Homestyle Meat Tortellini from Venda Ravioli on Federal Hill in Providence. We had had the tri-color for a few years, which have been a great seller, bot are equally as good and sometime I combine a little of each mixing both together. 


 So here is the recipe for the Tortellini Soup with Spinach and Tomatoes!

2 tablespoons butter
2 tablespoons olive oil
6 cloves garlic, minced
16 ounces chicken broth (or vegetable broth if for a veggie version)
16 ounces of water
16 ounces frozen Venda Tortellini (meat, tri color, or both)
16 ounces canned, diced tomatoes, with the juice
2 cups of sliced mushrooms
10 ounces spinach, washed and stemmed and chopped
10 basil leaves, coarsely chopped
Grated Atwell's Gold Cheese for 
topping (or Parmesan Cheese)
In a large pot (I used my Dutch oven), sautée garlic in oil and butter for about two minutes on medium-low heat. Add the mushrooms and cook until for 4 to 5 minutes or until they have sweat out the bulk of their moisture
Add broth and water to the pot and bring to a boil. Add frozen tortellini and cook for half the directed cooking time written on the package. (Around 5 minutes.)
Add tomatoes and juice, reduce heat to simmer for a few more minutes. Stir in spinach and basil, and simmer for another minute. Add salt and pepper to taste. Serve with grated cheese.

** If you want to make the soup a bit more hearty feel free to add some zucchini squash, white cannelloni beans, diced sweet potatoes, artichoke heart, roast chicken or italian sausage. 


There is no better brand or canned tomatoes. They are worth the few extra nickels.  Of course homemade is best but, the goal of this meal is thirty minutes or less. 


Tuesday, January 29, 2013

Roasted Cauliflower Mac & Cheese


The Vegetarian Times


     This winter I had seen several posts for a Cauliflower Mac & Cheese and all of them looked amazing. Some started off with roasted cauliflower and then went on to add all sorts of goodies, like broccoli, peas, bacon, tomatoes, and chicken. All of them looking delicious. Finally last Sunday I got to  give my hand at making my very first Cauliflower Mac & Cheese!

 After looking over many recipes I had finally settled on the one from the Vegetarian Times to use as my base. However, instead of boiling or steaming the cauliflower I had decided to roast it in the oven at 375*f for 15 minutes with just a little bit of olive oil on it. I also added some shallots, garlic and prosciutto that was left over in my freezer to the sauce.  It was pretty delicious and definitely something that I cannot wait to try again.


Recipe: Adapted from the Vegetarian Times

1 Head of Cauliflower, broken into 1 inch florets
2 Shallots sliced
2 cloves of Garlic, chopped
4 strips of prosciutto, sliced into small bits
1 cup of grated cheese like cheddar or monterey jack ( I used Narragansett Creamery's Atwell's Gold!)
2 egg yolks
2 tbs of butter 
2 tbs of flour 
2 cups of low fat or whole milk 
1 pinch of red pepper flakes 
Salt & Pepper
2 tbs of olive oil
1 1/2 cups of bread crumbs

  • Pre heat the oven to 375*f. In a large baking dish add the Cauliflower florets. Toss them in Olive Oil and bake for 15 minutes or until golden brown on the tops. Remove from oven and set aside
  • In a medium sauce pan over  low to medium heat add the butter, garlic, shallots and prosciutto. Cook together for two minutes. Add the flour and stir until it is fully combined and a paste is made. 
  • Remove the pan from the heat and slowly stir in the milk until the mixture is smooth. 
  • Return the pan back to the stove top, stir until the sauce thickens.
  • Add the grated cheese and red pepper flakes to pan, continuing to stir. Stir until the mixture is smooth and creamy ( about 7 to 8 minutes.) 
  • Add the egg yolks into the sauce and combine.
  • Pour the sauce over the cauliflower florets and top it all of with a coating of bread crumbs. Bake in the oven at 375*f for 30 minutes. 


Monday, January 28, 2013

Béchamel Sauce: A kitchen basic.

Pink-Apron.com


  The frenchness of the name béchamel has a tendency to scare of the average kitchen avenger but, in all truth it is as easy and quick to make as any can of condensed soup is to make. Once you learn how to make a  béchamel sauce you will never pick up a can of campbell's cream of anything soup ever again. I promise.

 A béchamel sauce is extremely versatile you can add some cheese to it and layer it into your lasagna or have over some of Venda Ravioli's Beef Tortellini (YUM!) It is the base to all all good au gratins and casserole dishes with out the sodium and preservatives.  Mix up the flavor by adding fresh or dried herbs and spices after the milk/ liquid has been added before you return it to the heat.


The Little GSP: Baked Tortellini with Peas and Ham

Add grated cheese, french mustard and Worcestershire for a Mornay Sauce, which is delicious with chicken and/ or pasta.


Recipe for a Basic Béchamel Sauce:

2 tbs of Unsalted Butter
2 tbs of Flour
1 cup of Whole Milk
Salt & Pepper
Pinch of Nutmeg*


  •   In a heavy bottomed sauce pan over medium heat melt the butter and blend in the flour. Combine the flour and butter until you smell a slightly nutty scent coming from the flour (about 2 minutes.) 
  •  Remove the pan from the heat and slowly add the milk in stirring constantly. Blend until smooth. 
  • Return the pan to the burner at medium heat and cook slowly, stirring constantly, until the sauce has thickened and smooth. 
  • Season to taste with salt and pepper. 
  • I like to add a pinch of nutmeg as it adds a little flavor kick to the sauce. 

For a thin béchamel sauce: use 1 tablespoon of each butter and flour per 1 cup of milk 
For a medium béchamel sauce: use 2 tablespoons of butter and flour per 1 cup of milk 
For a thick béchamel sauce: use 3 to 4 tablespoons of butter and flour per 1 cup of milk 

To make the sauce lighter: substitute stock or white wine for all of the milk or a portion of it.  If you want to make the sauce ahead of time it can be portioned out and frozen. 


Monday, January 7, 2013

Really Real Mayonnaise

The House by The Sea


  Yesterday afternoon, just after returning home from a weekend visiting with my mother and sister in Maine,  I made my way to the kitchen to start in on dinner and also get some lunch stuff for the week ready.
 There I am at the counter everything for my tuna salad is chopped and diced in the bowl ready to be mixed but, oh no, we have no more mayonnaise! This could have been tragic, especially for me who really really wanted a nice tuna sandwich after the 3 hour drive. Luckily for me after a few quick taps on Google I was able to find an amazing recipe for Real Mayonnaise from the NY Times*  that took less time than it would be to drive to the store and purchase some. Bonus there was a also a video to follow that made it easier and was entertaining at the same time.

 I used a little bit less oil that suggested as I did not want mine to be as runny but, the amount was just perfect and it made my Tuna Salad Sandwich spectacular. Now that I know how easy it is to make and how delicious it is I cannot wait to test it out in all different dishes.

Mix it up and add fresh herbs, spices or sauces to make all different flavors.


 *Keep in mind that this recipe has raw egg in it and will only last for a few days before it spoils and it should not be left out in the summer's sun and heat for too long.


Thursday, January 3, 2013

Avocado Grapefruit Salad with Bacon & Feta Cheese


     With New Year came Winter's cold weather and over the last few days I have been craving the warm rays of the sun. Finally it hit me if I cannot feel the warmth of the sun at least I can enjoy the citrus fruits that joyful grew in her rays. Ever since then I have been on my mad citrus kick!

  I found this amazing and adaptable recipe for the Avocado and Grapefruit Salad on Pinterest and decided to give it a whirl. So far I have made it for dinner, lunch and even for breakfast with a poached egg and english muffin on the side. Serve it up in a tortilla bowl and top it off with blackened chicken or seasoned shrimp 


Ingredients: 
2 Avocados halved, pitted and peeled 4 cups Olivia's Spring Mix
3/4 cup Narragansett Creamery Salty Sea Feta Cheese, crumbled
6 slices Apple Wood or Regular Bacon, crumbled
2/3 cup Red Onion, sliced
1/2 Green or Red Bell Pepper, sliced into match sticks

1 large Pink Grapefruit, sectioned and cut into large chunks 
1/4 cup of D.E. Vine Honey Balsamic Dressing
1/4 teaspoon ground black pepper
Pinch of Sea Salt 


   In a large bowl toss all the ingredient together and serve.