Tuesday, October 9, 2012

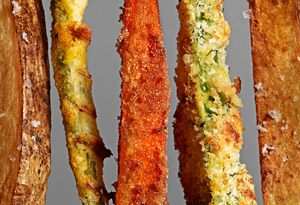
Shameless French Fries in All Flavors

Photo Credit: Oprah.com
 French Fries are often a favorite of kids (and adults too!) They are the ying to a burger or chicken tenders yang. With more families watch the quality of food and nutrition that makes it to the dinner table these days french fries are more of a treat than a stable.  But, this does not always have to be the case... French fries do not have to be made with potatoes and they do not have to be fried. They can be made with all types of vegetables and baked in the oven with a deceiving crisp of deep fired goodness.

  It all starts with a simple batter or coating for the "fries." My favorite is a simple base of Kenyon's Cornmeal, flour, salt, and eggs. It is a the foundation for a crispy coating that will impress event the pickiest of eaters and you can build on it by adding your own seasonings like, fresh herbs, dried peppers, and grated cheeses.

Coating Ingredients:


  • 8 ounces of sliced vegetable (sticks) 
  • 2 large eggs beaten
  • 2 tsp of salt
  • 1/2 cup of Kenyon's Cornmeal
  • 1/4 cup of unbleached flour   
In a medium shallow bowl beat the eggs and set aside. In a large shallow bowl combine the salt, cornmeal, flour and seasoning of your choice.
 First dip (or dredge) the vegetables in the egg and then coat them in the cornmeal four mixture. Place the coated vegetables on a lined cookie sheet. Bake the fries at 425*f for 15 to 20 minutes or until the coating is crispy and golden brown.

Serve with BBQ, ketchup, or any sauce of your choosing!

Here are a few of my favorites...

Quick and Easy Cheaters Aioli:

Spicy Siracha Aioli

  • 1 tsp of roasted garlic(from a jar or tube)
  • 1 tbsp of olive oil (not EVOO)
  • 3/4 cup of light Mayonnaise
  • 1 tsp of Siracha Sauce
 In a bowl combine all of the ingredients together and serve. 

Chipolte Aioli

  • 1 tsp of roasted garlic(from a jar or tube)
  • 1 tbsp of olive oil (not EVOO)
  • 3/4 cup of light Mayonnaise
  • 1 tsp of Chipolte Pepper Flakes
 In a bowl combine all of the ingredients together and serve. 

Tarragon Aioli
  • 1 tsp of roasted garlic(from a jar or tube)
  • 1 tbsp of olive oil (not EVOO)
  • 3/4 cup of light Mayonnaise
  • 1 tsp of dried Tarragon or 2 tbsp of fresh chopped
 In a bowl combine all of the ingredients together and serve. 

Friday, July 6, 2012

Grilled Salmon and Avocado Salad


  Now that the 4th of July is past, it is time to move on from the hot dogs and hamburgers. I am not sure about you but, I am definitely burger and dogged out!
 With the hot summer days and nights it the perfect time for me to start perfecting my summer salads again. The last thing I want to do is turn on the oven and bring the temperature of the kitchen up by another 20 degrees. So... For the next 8 weeks my grill will be in over drive cooking up all the dinner table essential!
 A few weeks back I was looking for a light and flavorful salmon salad when I stumbled across this fresh little thing over at avocado.org. There were some slight changes that had to made in order to use the ingredients that I had on hand that came in my delivery from the cowtruck. Also, the whole thing came together in less than 30 minutes!!

Grilled Salmon:
 2 - 8oz filets of Salmon
 1/4 cup of olive oil
 1 tablespoon of Orange Juice
 Sea Salt & Pepper to taste

Salad:
 1/4 a package of Olivia's Baby Spinach
 1/4 a package of Olivia's Mixed Greens
 1/2 a red onion sliced thin
 1/4 cup of English Cucumber Sliced thin
 1 orange, peeled and sliced (pith removed*)
 1 avocado sliced
 1/4 cup of Narragansett Creamery Salty Sea Feta Crumbled
 1 ear of fresh grilled corn off the cob
 1/4 cup of D.E. Vine Honey Balsamic Dressing 

Combine the olive oil and orange juice in a bowl with the salt and pepper. Marinate the defrosted Salmon in the olive oil and orange juice for at least 15 minutes while you prepare the salad ingredients (can be marinaded for longer in the refrigerator.) Grill over medium heat for 6 to 8 minutes on the bottom side, then flip and cook for another 6 to 8 minutes.

 In a large bowl toss together the all the salad ingredients with the salad dressing until evenly coated. Plate the salad onto two plate or large pasta bowls and top with the grilled salmon. Serve and Enjoy!

 I have also served this same salad with a scoop of Quinoa or Couscous over the greens and under the salmon either warm or chilled. It is a great way to use up extra left overs that you might have in the fridge. Left over grilled vegetables are another great options too.
 Chicken, shrimp or cod can also be substituted for the salmon using the same marinade. Just make sure to adjust your grilling time.

 *Leaving the pith on the orange will cause a bitter aftertaste that can offset the flavors of the salad.

Tuesday, June 12, 2012

Have Chicken, Bacon & Ranch. Will Make Pizza!

In my house pizza is always a winner for dinner any night. However, I am always up for trying something new and different. Pizza can be a great way of getting creative and cleaning out the fridge at the same time!
photo credit: Feisty Fork
   The other day I was perusing the perusing the internet looking for new ideas to add to my list of must try's when I came upon a post over at The Feisty Fork. It immediately caught my eye as a yummy and easy dinner choice for a weeknight meal. Because, it was a Monday I cheated with the Top This! Pizza Crusts instead of a making my own dough or using frozen. However, it did cut the prep time down significantly!

Makes 2 Pizza's

 1 Package of Whole Wheat or White Top This! Pizza Crusts
 8 oz of your favorite ranch dressing
 1 package of Supreme Shredded Cheddar Cheese
 2 Maine Backyard Tomatoes diced
 1 red onion chopped
 1 cup of corn kernels
 1/2 lb of cooked Plumrose Bacon crumbled
 3 grilled chicken breasts chopped

Preheat the oven to 500*f or the grill to 600*f. If you are using a  pizza stone make sure to preheat the stone in the oven or on the grill.

  Using a spoon or spatula evenly spread the ranch dressing down on the base of the pizza as you would the sauce. Next layer on the rest of the toppings to evenly cove the crust of the pizza. Make sure to not gather too many toppings in the center of the crust as it will weight it down and get soggy. Finish the pizza with the cheese.


 Bake in the oven for 10 to 12 minutes or until the edges of the crust are golden brown and the cheese is melted. Let the pizza sit for 2 to 4 minutes before slicing so you do not pull the topping when cutting.
 Slice and enjoy with a yummy summer salad or fresh garden veggies on the side!

Monday, June 11, 2012

Fresh Lemon Garlic Grilled Shrimp Caesar Salad

        
photo credit: The Salon


  I had found an amazing looking salad over at the Salon Kitchen Challenge. It was the winning entry by Lucy Mercer for a Loaded Caesar Salad with lemon, garlic shrimp and avocado. It had immediately caught my eye and stomach. The salad itself is so versatile, in being that you can add more fresh veggies, change the shrimp for salmon, chicken or steak of just leave it as is (which is excellent!)

I have made a few adaptions from Lucy's Original Recipe work with what is available from the Cowtruck and to also adapt to what I already had in my fridge too ;)

Caesar Dressing:

 2 lg egg yolks
 1 tbsp  of fresh lemon juice
 1 tbsp of white wine vinegar
 1/2 tsp of  Worcestershire sauce
 1 tbsp of Dijon mustard
 1/4 tsp of anchovy paste*
 1/4 cup of olive oil**

 In a blender combine all of the ingredients, except for the oil, and blend until full combined (you can whisk if a blender is not available.) Slowly add the oil the other ingredients until it is emulsified. Refrigerate the dressing until ready to serve. Can be made ahead by 4 hours.

* I keep a tube of anchovy paste in my refrigerator at all times. It is easier and more economical than dealing with cans of anchovies.
** Note that the recipe calls for olive oil not extra virgin olive oil. The EVOO flavor will be too strong for the dressing and over power the rest of the ingredients.

For the Salad:
 
 2 heads of romaine lettuce chopped into 1 inch bite sized pieces
 1/4 cup of grated Atwell's Gold Cheese from Narragansett Creamery
 1/2 red onion diced
 1 avocado diced
 
 Just before serving toss the lettuce in the dressing. Equally the divide the lettuce onto four salad plates. Top each bowl with avocado and red onion and a sprinkling of Atwell's Gold Cheese.  Lay 2 skewers of cooked over each bowl of salad

Lemon Garlic Shrimp

 32 peeled shrimp 
 3 cloves of garlic, minced
 2 tbsp of olive oil
 3 tbsp of fresh lemon juice
 sea salt and fresh ground pepper to taste
 soak 8 -  4" skewers in water

 In a large bowl combine all of the ingredients and whisk together.  Toss the shrimp in the marinade until it is fully dressed. Cover the bowl and let it rest in the refrigerator for at least one hour.
 Skewer the marinaded shrimp five to six shrimp to a skewer.
On a preheated grill (medium to 400*f) lay the skewers on the grill grates and brush with the remaining marinade. After about 4 minutes flip the shrimp and cook until they are pink (about 1 to 2 minutes.)

 In place of the croutons I had made bread sticks using frozen pizza dough.

1lb of defrosted whole wheat pizza dough defrosted.
2 tbsp of melted unsalted butter
3 cloves of crushed garlic
sea salt & pepper to taste
sprinkling of chopped parsley

 Defrost the dough and work it into 8 equal sized balls. Roll the ball into tubes about 1/2 - 3/4 in thick and about 3 to 4" long.
 On a lined baking sheet or warm pizza stone place the bread sticks into a preheated 450*f degree oven for 12 to 14 minutes or until golden brown.
Pull the rack with bread stick out of the oven and brush the tops of the bread sticks with the melted butter and sprinkle with the salt, pepper, garlic and parsley. Return the rack to it's place and bake for another 2 to 3 minutes.
Serve the bread sticks warm with the salad.

Wednesday, May 23, 2012

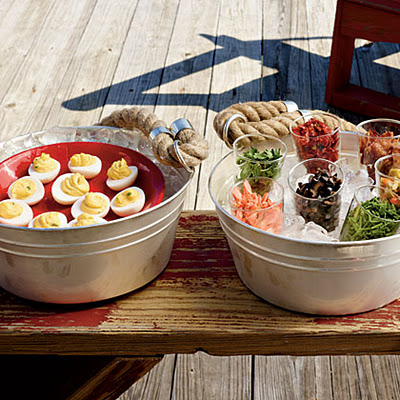
DIY Deviled Egg Bar

  Bring it Back Old School with a Deviled Egg Bar!


Photo Credit: Maddycakes Muse


  Deviled Eggs were a staple of my youth. You could expect to find them at every family gathering, holiday and garden party. My mother even had a plate that was in the shape of the chicken with small grooves in place to hold the eggs so they would not slide around.
 Over the past few years I have seen deviled eggs appear as a retro option on an appetizer menu with different twists on the classic like: pulled pork, raisins and curry, and always bacon. It was recently when I was out with some girlfriends that I heard of the Deviled Egg Bar that was recently featured as the main appetizer at a hen party. It sounded so cool and fun! Immediately my attention was focused and now obsessed with having one myself.

Photo Credit: Maddycakes Muse
 There are several things that are pretty amazing about having a Deviled Egg Bar:
  1.   You can let your guest get creative and have fun with their food
  2. It is a relatively simple set up and you are not having to worry about making 5 different apps for the party. (A cheese board or veggie tray is the only addition you may need!)
  3. Much of the prep can be done ahead of time allowing for less stress!!!
  4. Everyone will walk away amazed at your ingeniousness and what a great host/ hostess you are! 
Martie Knows Parties


The Toppings selection is where you have all the fun! 
Keeping all the offering chopped into small bits so they can be sprinkled onto the yolk mixture and stick is very important. If the pieces are too big they will slide off and end up on the plate not the egg.
Here is a list of some of my favorites:  Apple wood Smoked Bacon, Blue Cheese, Crab, Capers, Curry Powder, Olives, raisins, Sun Dried Tomatoes, Pimentos, Roasted Red Pepper, Smoked Salmon, Ham or Prosciutto, Shrimp, Crab, Lemon Zest, Lobster bits, Feta Cheese Crumbles, Caviar, Sour Cream and assorted Fresh Herbs (basil, cilantro, chives, dill, parsley.)


Cauliflower and Potato Salad

        
Photo Credit: Eating Well Living Well


   It is no secret that for years I have been adding cauliflower to mashed potatoes, soups and other such things in order to cut down on the amount of starch and add some extra vegetable to a dish. Often times I will not announce this until after the meal has been devoured and the accolades given. It is the surprise of the diner's face that gets me every time, when they realize they have just eaten cauliflower (something they often attest to being a vegetable they do not usually like!)

 Now masking cauliflower in potato salad is little bit harder, nonetheless; over at the Guilty Kitchen I have found a delicious and mouthwatering recipe for a Cauliflower and Potato Salad that children of all ages and of the finickiest palates will enjoy! 

Cauliflower and Potato Salad: adapted from: Guilty Kitchen
Yield: 6 healthy servings
Prep Time: 20 minutes
Cooking Time: 15 minutes
Can be made one day ahead of serving

1 head of Cauliflower, cut into 1/2 inch pieces
1 lb of Narragansett White Potatoes, cut into 1/2 inch cubes
1 1/2 cups of peas
2 tbsp of olive oil 
2 large Christoper Ranch Shallots, sliced*
2 cloves of garlic, minced*
2 tbsp of white wine vinegar
3 tbsp of olive oil 
1 tbsp of horseradish
sea salt & fresh ground pepper to taste
2/3 cups of Narragansett Creamery Sea Salt Feta, crumbled
1 tsp Dijon mustard
1 tbsp mayonnaise
2 tbsp of Stonyfield Plain Yogurt


 In a medium size pot soak your cut potatoes in cold salted water for at least 30 minutes. Strain and rinse the potatoes. Refill the pot with room temperature water and return the potatoes to the pot and boil the potatoes on the stove until they are fork tender. Once they are done remove them from the stove, strain them and allow the potatoes to cool in the colander to drain of all excess water.
 In a steamer, steam the cut cauliflower until it is al dente, has a slight crisp, about 6 to 8 minutes. Allow the cauliflower to cool to room temperature. 
 Using the same steamer cook the peas for 4 minutes. Remove from the steamer and set aside to cool.
 In a small saute pan heat the 2 tbsp of olive oil over medium heat. When the olive oil begins to swirl and dance in the pan add the garlic and shallots. Saute until the shallots are translucent, about for to five minutes. 
 In a small mixing bowl add the following ingredients to make the dressing: olive oil, horseradish, salt and pepper, crumbled feta cheese, Dijon, mayo and yogurt. Stir until well combined.  Combine with the garlic and shallots. 
 Combine the potatoes, cauliflower and peas in a large mixing bowl. Add the dressing and gently toss the ingredients together making sure to coat evenly. 
 Cover the bowl and chill in the refrigerator until it is ready to be served!!
*If you do not want to use the garlic and shallots, chopped red onion can be substituted. Use 1/2 cup of fresh raw red onion (do not saute it.)

Monday, March 26, 2012

Mini French Toast!

Cinnamon Sugar French Toast Bites by: Multiply Delicious

 I love breakfast! However, from Monday to Friday I am not all that great at finding the extra few minutes in the morning to do anything more than pour myself a bowl of cereal or add some water to instant oatmeal. On a recent trip to the grocery store I had checked out a few different breakfast items in the freezer aisle that might be good items to have available. 
 After a brief perusing and label reading of the options available I had decided that it would be healthier for myself to make at home and freeze. Personally I have a thing about being able to identify and pronounce all the ingredients in the food that myself or those I care about will be consuming...

 French Toast Bites (or Sticks depending on what you prefer.) 

 As a child french toast was one of my favorite breakfasts to have, smothered in syrup, powdered sugar and butter! It can also be made ahead in bulk and frozen for reheating in the toaster oven or microwave quickly and easily too for a quick breakfast or snack.

Ingredients:
 
  8- 10 Slices of Bread* ( I prefer Cinnamon Raisin Bread)
  4 Eggs
  1 cup Milk**
  2 tablespoons of Sugar
  1 teaspoon of Vanilla Extract
  1/4 teaspoon of Ground Cinnamon
  1 tablespoon of Maple Syrup

  2 tablespoons of melted butter for brushing.

Preheat oven to 425*F

Stack the bread four to five slices high and cut into thirds lengthwise and again width wise to make small bite sizes pieces about one inch square. Set the bread aside until it is ready for dipping.

 In a large shallow bowl combine all of the ingredients (eggs, sugar, milk, vanilla, cinnamon and syrup.) Whisk together all of the ingredients until fully combined. Add about 10 pieces of the bread at a time to the mixture using a slotted spoon to toss them around the mixture to get fully coated. Use the spoon to transfer the cubes to a non-stick or greased cookie sheet brush the tops of the bites with the butter. You might need two cookie sheets.

  Bake for 10 to 12 minutes or until the tops are browned. Remove the pan from the oven, turn the bites over and brush with remaining butter. Return the pan to the oven and bake for another 6 to 8 minutes, or until the the bites are browned.

  Set aside a few to eat right away and let the rest cool on a bakers racks. Once the bites are cooled transfer 9 bites to a snack back and put them in the freezer to freeze. I will add all the snack bags to one large Ziploc freezer bag for better organization in the freezer and label and date the large freezer bag. To reheat the bites either heat them in the toaster oven 3 to 5 minutes or in the microwave for 1 minute. They can be microwaved right in the bag for a really quick snack on the go.

*If you have some bread left over that is a bit stale or is on it way to getting there that is best type of bread to use for making french toast. It will hold up to the egg dip much better and won't be as mushy.

** Milk: When cooking with milk I find that either low fat or whole milk is best, skim milk has a tendency to get watery. Buttermilk can also be used for a different flavor.